Hello everyone and welcome to post 43 of Strength & Conditioning For Therapists. I hope you’re all still keeping safe and well. Last time we looked at measurement error in the assessments of muscle strength and the implications of this. This week we’re going to look in more detail at set up and protocols for accurate and reliable hand held dynamometer strength testing. It can be a dry subject, but so important, so please read on. Plus I’ve used lots of pictures to make it interesting 🙂
Why Do We Measure Strength?
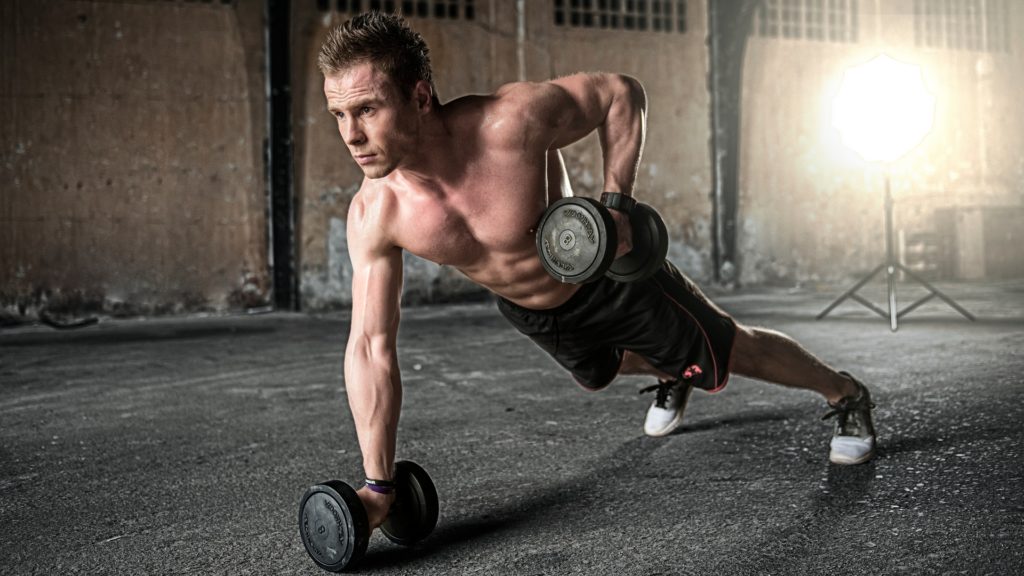
So, the reason for taking measurements is to judge change; essentially we’re asking “has this person’s performance changed or not?” If we’re taking assessments over time, we can illustrate this figuratively- see below, We’re effectively using are points 1 and 2 different? They look to be don’t they? One is higher than the other. But how do we really know..?
We discussed last week the concept of measurement error and how this error, or variability can influence the accuracy of our measures and skew our interpretation. What we’re trying to do is minimise the error, or variability through adequate standardisation of test procedures, protocols etc and by minimising the intrusion of learning effects through familiarisation.
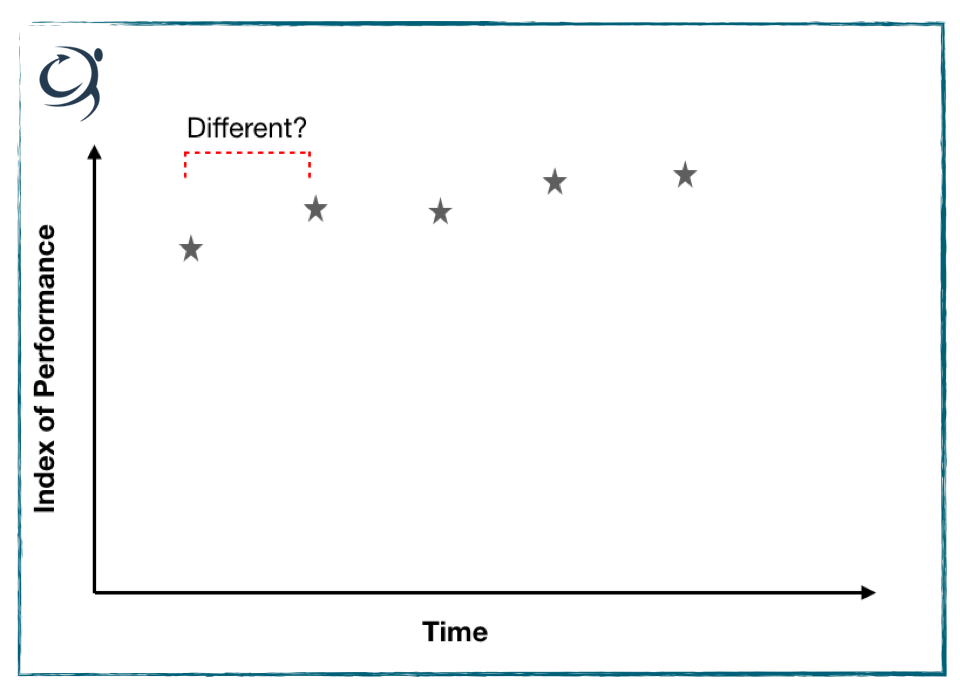
Once we’ve done this, there will still remain an error on the measurement, that is to say the output or figure you see – let’s say 100N for a measurement of strength, will be accurate to plus or minus a certain percentage, but hopefully it’s minimal. See this exemplified below. We were asking were points 1 and 2 different, i.e. had the patient improved on the second measurement? Well, if we know through calculation of our measurement error (see here on how to do this) that the %error on our measurement is, say 10%, then if the second measurement exceeds the baseline by 10% then yes, it’s likely to be different and performance has really changed. If it’s less than 10% then no, it’s essentially the same.
Check out the grey box; here I’m illustrating a +/- 10% measurement error, or variability. It nicely shows that point 2 does not exceed a 10% ‘difference’ from point 1. In fact, it’s not until measurement 4 where we see a true performance difference. By the way V% represents coefficient of variation and I’ve talked about that here.
Hand Held Dynamometer Strength Testing
Right, so can we rely on the instructions that come with our hand held dynamometers (HHDs) to help minimise the error and maximise the accuracy of our tests? Well not really, I think we can aim for better. Here’s the instructions that accompany the Lafayette HHD, and an instrument that I like actually:
“The test is performed with the clinician applying force to the limb of a patient. The objective of the test is for the clinician to overcome or “break” the patient’s resistance. The Hand-Held Dynamometer records the peak force and the time required to achieve the “break” providing reliable, accurate, and stable muscle strength readings that conform to most manual muscle testing protocols” (LINK).
What’s wrong with that? As we mentioned last week, we want to minimise the intrusion of error in each measurement that we take. You as the assessor holding the HDD represent an additional source of variability in this set up and will contribute to the variability, or error of the measurement. Contrast this to a situation where the HHD is secured and immovable and the patient has to push against it.
Improving your Hand Held Dynamometer Protocols
The key thing is to ensure you replicate the same set-up each and every time with each and every patients. If you’re holding the HHD, can you guarantee your consistency each and every test? No. We’re human and we’re variable. So what can we do to minimise the technical error – the variability of the test set up?
I’ve suggested before fixating the the HDD to something immovable to take you out of the equation – or at least minimise your input. Let’s have a look at some practical applications on how that might work
Assessing The Shoulder
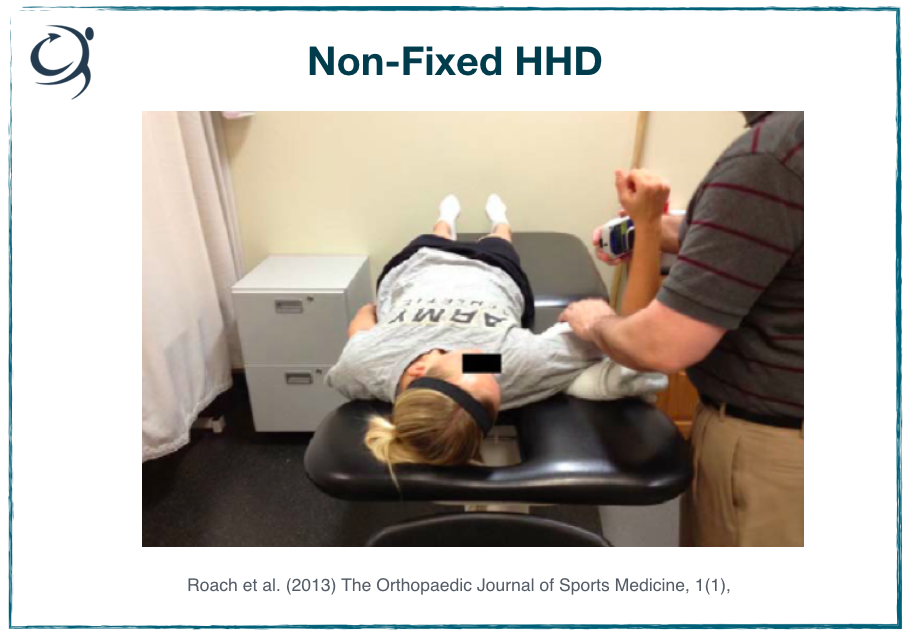
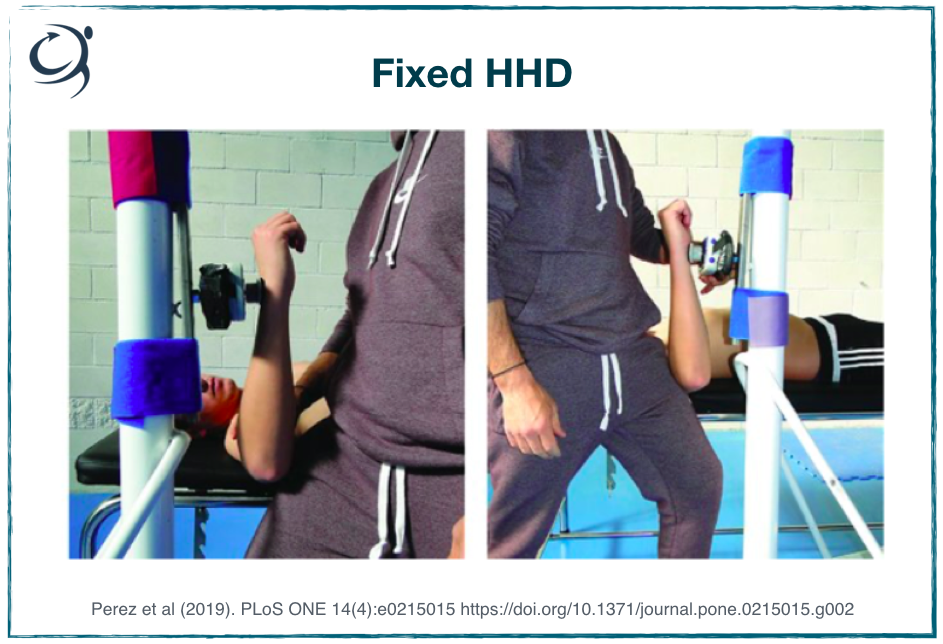
Right, so this is an example of a non-fixated HHD assessment of internal shoulder rotation strength. What can you see about the set-up? Let’s assume that the joint angles have been standardised and measured (abduction, flexion angles etc). The humerus is supported on a towel, but by how much does this elevate the humerus off the bed by, is this measured, is the same towel used for everyone in every test, does it compress and move during the test etc.
The HHD is placed, let’s say at a standardised position on the lower arm, fine. But look a the position of the experimenter. They are holding the HDD in place, have to apply a pulling force during the test, with a flexed elbow. They also need to stabilise the upper arm during the text; is the pressure on the biceps uncomfortable etc. etc.
Improving The Test Set UP
You see where I’m going with this don’t you? In the absence of any measure at all and where you’d expect large changes in performance, this might be okay. However, if we can remove ‘you’ from the test in place of a more standardised, immoveable set up then the outcome measures are going to be far more reliable.
Have a look at the test set up below, direct comparison in the picture on the right. It’s not perfect, but I think a lot of the sources of variability have been minimised. The HDD is fixed securely to an immovable pole. The upper arm is supported by the bench, the test administrator stabilises the joint by using their thigh. As I said, it’s not perfect, but much better. I’m sure you could think of other ways to improve this test.
For example, you could perform it seated, and stabilise the torso and upper arm in different way. I encourage you to think about what you could do in your own clinic.
Don’t forget, while maybe your protocol differs slightly from the clinic down the road, as long as you’re being consistent within your clinic and you’ve taken every step to minimise measurement error, that’s okay. Remember, you’re comparing repeated measures within your clinic not between different clinics.
Assessing The Knee
Right, so here’s the figure that come with the Microfet HHD. What do you reckon??
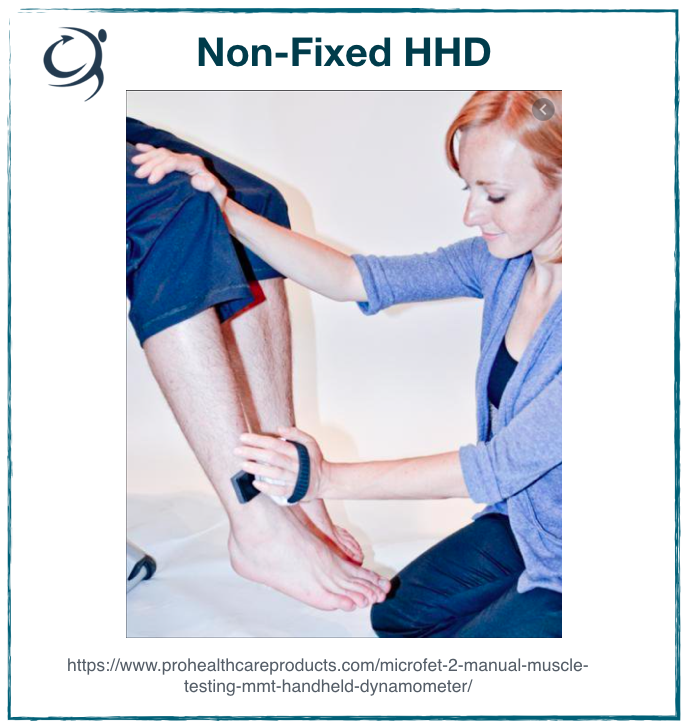
How many protocol improvements can you list …. go on, have a go. Get a pen and write them down. See if you can get to 20.
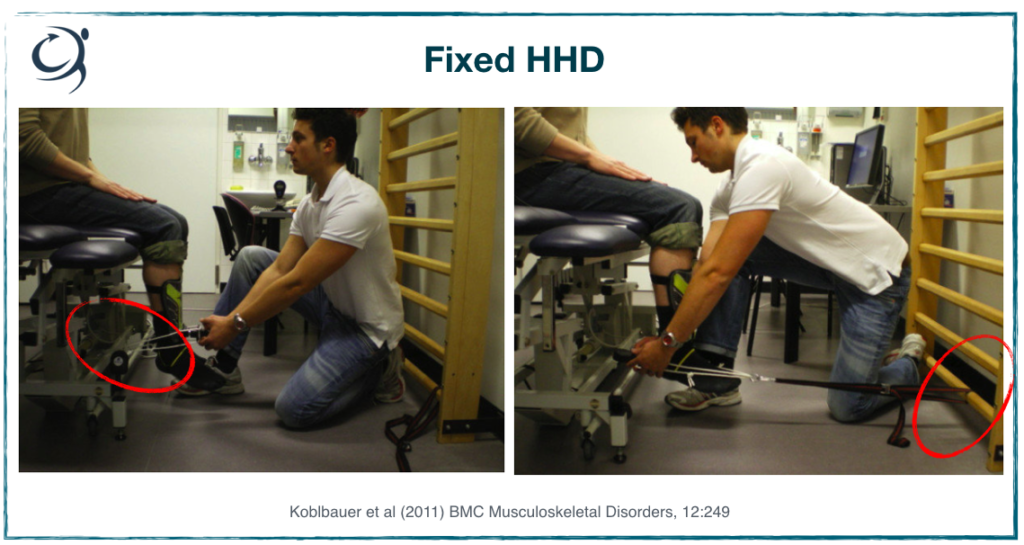
Now, contrast this to below – direct comparison is in the image on the left. I’ve highlighted with the red circle where the authors have tethered the HDD to something immovable (the bed) and have used inextensible strapping to secure it to the lower leg. You can also see that they’ve decided to use a shin pad to minimise the discomfort (they’d also let go of the device during the test).
In the same position, they’ve illustrated knee flexor testing – same principles. I just might add here that for knee flexor testing in a seated position you’d want to secure the thigh to the bed by strapping placed just proximal to the knee. As the patient flexes the knee with maximal force, the joint wants to come off the bed – a source of technical variability.
Again, I encourage you to think about your own clinic. What can you use, consistently, to minimise error and maximise accuracy and reliability of your hand held dynamometer strength testing? Consider also the rest of the patient positioning. It’s best to have them seated securely (is there a back to the apparatus that you’re using; can you use a wall. Also make sure you get them to cross their arms so as not to provide additional leverage.
Summary
There, I told you that reading this wasn’t going to be all that bad ;-). Hopefully what you’ve gleaned from this series of articles are:
- Measurement is important to asses whether or not your interventions have caused a change
- Measurement error can negatively influence the meaningfulness and usability of a test, and of its outcomes
- Measurement error come from biological and technical sources
- Standardising procedures and protocols can minimise measurement error and improve the accuracy and usability of your test results
Interested in knowing more and how to improve your HHD measures in clinic? OR perhaps you’re contemplating purchasing a dynamometer for your practice. Check out the link below
References
- Perez et al (2019). PLoS ONE 14(4):e0215015 https://doi.org/10.1371/journal.pone.0215015.g002
- Lafayette: https://lafayetteevaluation.com/products/lafayette-hand-held-dynamometer
- Roach et al. (2013) The Orthopaedic Journal of Sports Medicine, 1(1)
- Microfet: https://www.prohealthcareproducts.com/microfet-2-manual-muscle-testing-mmt-handheld-dynamometer/
- Koblbauer et al (2011) BMC Musculoskeletal Disorders, 12:249